Note: If you're author of content restored in this topic and want to manage these files on your own (e.g. for updating attached files to their latest version), feel free to ask forum administrators to replace poster of the topic all following related replies by your forum profile, which will allow you to edit the topic according your needs and wishes.
How to create a car from scratch by Genetleman
Which tools / files will you need?
* The free car editor of Juan (download here).
Check out his other cool stuff and required files for using them too.
* A template of a blank car (download here).
First steps
Start the car editor, choose <Load> and open the Blank X.car file for editing. You will find lots of values in the table - don't worry yet
Start your car creation by giving it a name: MyCar
After this you should save your car to a new file named MyCar (click <Save>).
- Carmaking 1.jpg (20.57 KiB) Viewed 49018 times
- Carmaking 2.jpg (26.89 KiB) Viewed 49018 times
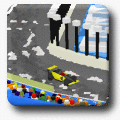
What are we going to create?
A car! Who guessed that? Nono, you can also create planes, boats, helicopters, skateboards, bicycles etc. but we just want a simple car which should look like the one in the left picture (very simple).
Click on <Model> in the upper right corner to open the Edit Model window. The window is divided in 5 parts: a toolbar at the left, 3 two-dimensional squares (front, side and top view of the car) and a three dimensional square.
The four blue circles are the wheels of the car. The easiest to understand is the top view (lower left quadrant). You are looking at the "car" like a bird. The car front points southward.
- Carmaking 3.jpg (17.48 KiB) Viewed 49018 times
- Carmaking 4.jpg (15.79 KiB) Viewed 49018 times